Sewing Bias-Cut Lingerie

Make your own sleep set aka The Great British Sewing Bee (Vogue Pattern 8888)
This week on the Great British Sewing Bee, we saw the majority of contestants making their sleep sets from bias cut fabrics. Bias cut garments will follow your curves beautifully and are comfortable to wear, but sewing on the bias can have some tricky issues to contend with. I’ve put my top tips below.
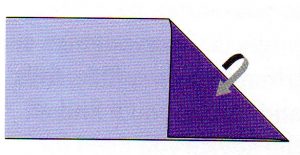
Fold the cut edge towards a selvedge to find the true bias
What is the Bias?
The True Bias is at 45 degrees to the selvedges of the fabric and is the most stretchy. This means you can create a softly flowing garment, with lots of stretch – which in turn often means you don’t need any fastenings – hence ideal for sleepwear!
To find the ‘true bias’, fold the cut edge of the fabric up so it is parallel with one selvedge – the diagonal fold is on the true bias. Note if you pull it along the diagonal, it will stretch much more than if you pull the fabric down the straight length or across the width. NB: When using a commercial pattern, the grainline on the pattern piece will show how to lay out the piece on the fabric, keeping the grain line parallel to the selvedge so the pattern piece is on the bias.
Tips to success
- Cutting out – Pin the tissue to the fabric with plenty of pins to prevent it shifting and moving as you try to cut out.
- Stay stitch before too much handling – There are always edges that should not stretch, such as the neck edge, so secure the bias cut edges of these as soon as possible with stay stitching. This is a row of straight stitching just inside the seam allowance, about 12mm from the raw edge. For necklines, sew from shoulder to centre neck and then the other shoulder to centre neck rather than continuing to sew from shoulder to shoulder which can result in stretching the fabric as you sew!
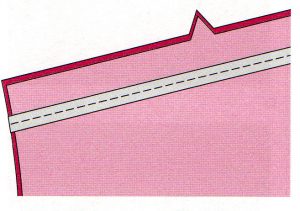
Stabilise shoulder seams with tape or ribbon
- Stabilising seams – Seams at shoulders and waistlines should not stretch. If they do, the bias cut garment may lose its shape. Stabilise these seams by stitching seam binding or twill tape into the seams, or use a stay tape (such as Vlieseline Edge Tape) that works well on lightweight fabrics, knits and curved edges.
- Support fabric pieces – particularly long nighties (or dresses). Don’t let them droop and hang over the table edge which can cause them to stretch out of shape before you even sew them!
- Use plenty of pins – Pin seam edges together with plenty of pins to help prevent them stretching as you work. When sewing bias seams such as side seams, hold the fabric in front and in back of the presser foot and stretch it gently as you stitch. This will allow the seam to ‘give’ as you stitch, and it will also relax into a smooth seam once it has been pressed with a steam iron.
6. Finishing seams – if possible use an overlocker with two thread or three-thread to neaten the seam edge. Or use the over-edge foot and an over-edge stitch on your sewing machine which closely resembles an overlocker (The fabric edge should butt up against the guide on the right of the foot and the stitch has a straight stitch to the left with a zigzag that goes over the fabric edge to the right.)
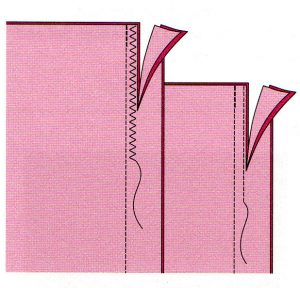
A double stitched seam is often used on lingerie and silky fabrics
Alternatively sew a double seam as Allie did – stitch with a small zigzag stitch close to the seam and then trim down the excess seam allowance close to the stitching. But take care you don’t cut into the fabric!
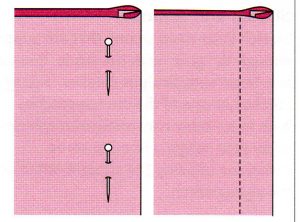
A French seam is perfect for lingerie as it encases the raw edges and provides a softer to the skin finish.
- French Seams also work well on lightweight bias cut fabrics. This seam adds a couture look to the inside of a garment and is soft against the skin. The finished seam, which should be very narrow, completely encloses the raw edges of the seam allowances.
– With the WRONG sides together, stitch a 1cm (3/8”) seam. Trim the seam allowance to a scant 3mm (1/8”) and press them open.
– Fold the fabric right sides together so the stitching is right on the fold and press again. Stitch 6mm (1/4”) from the fold. Press to embed the stitches and then press the neatened seam allowance to one side.
- Hemming – hang the garment for at least 24 hours before hemming if possible to let the bias seams droop if they are going to. Then level the bottom edge before hemming.

Burda 7627
Rolled Hem
This is ideal for lightweight and sheer fabrics, the hem allowance is minimal and thus doesn’t look unsightly from right side. If possible use a rolled hem presser foot which has a metal coil at the front through which the fabric is fed and rolled as it is stitched.
TIP: Use a piece of tissue paper at the start of the hemming to prevent the fabric being pulled into the feed dogs.
- To start off, turn under 3mm and again 3mm, finger press. Attach rolled hem foot but do not try and guide fabric into it yet.
- Stitch the first 2cm (3/4”), sewing close to the inner fold (move needle across if needed). Stop with needle down, raise presser foot and hook unfolded fabric into the coil on the foot.
- Lower presser foot and start stitching again, as you sew the fabric is fed into the coil of the foot and folds under itself. NB: It is easier to work if you hold the fabric slightly raised and to the left with your riht hand, whilst guiding the fabric straight with the left hand.
Rolled hem without specialist foot:
- Mark hem length then hem allowance of just 6 mm (1/4”). Fold up hem and very lightly press.
- Stitch as close to fold as possible then trim away any excess hem allowance.
- Fold hem again along stitching, rolling stitches just inside hem and stitch again close to inner fold.
Lettuce hemming is perfect for bias cut garments
Lettuce Hemming
If you are fearful of stretching the hem allowance as happened to two or three of our worthy contestants, consider a lettuce or fluted hem which is perfect and is supposed to have been stretched!
- If possible, use an overlocker, set to rolled hem (removing the left needle. Refer to users manual) and with a slightly tightened needle tension, stretching fabric as you sew in front and behind the needle.
- Or, you can do this by sewing machine – set your machine to a zigzag. Reduce the width to 3 – 3.5. Reduce the length to 0.4. (NB: you can also use an overedge foot. Check that the needle goes into the fabric easily and doesn’t hit the side of the foot or throat plate).
- Holding the fabric taut stitch on the hem edge, with right swing of needle falling off fabric, pulling fabric tight in front and behind the needle as you go.
TIP: Use a piece of tissue paper at the start of the hemming to prevent the fabric being pulled into the feed dogs.
Armed with these top tips for sewing bias cut fabrics, enjoy making up one of the most comfortable garments you will wear.